How Do I Set Up Yahoo Mail In Outlook 2016 For Mac
Your e-mail account is now set up. You may begin using Outlook 2016. Manual Setup or Additional Server Types. Follow these instructions to set up an e-mail account with Outlook 2016 either manually or using additional server types: 1. Open Outlook and select Manual setup or additional server types, then the Next button.
Once you’ve configured and activated your HostPapa email service, you can proceed to set up your email account in Outlook 2016. For easy webmail access, you can always use URL (replace yourdomain.tld with your actual domain) or if you utilize Basic/Advanced email service from any browser.
Automatic account setup The first time you run Outlook 2016, you’ll see a welcome screen that looks like this: Click Next to get started. If you’ve previously configured Outlook 2016, click the File tab at the top of the window and in the Info category, click the Add Account button. In the Add an Email Account wizard displayed, you’ll be asked Do you want to set up Outlook to connect to an email account? Ensure the radio button next to Yes is selected, then click Next.
In Auto Account Setup panel, enter the following details: • Your Name: Enter the name you’d like to appear on your emails. • Email Address: Your full email address. • Password: Your email account password. • Retype Password: Enter your email account password again.
Outlook will now attempt to retrieve your email server details and set up account access. Manual setup If your server cannot be found, check that the email address you entered is correct and try again. You can enter your server details manually by selecting Manual setup or additional server types.
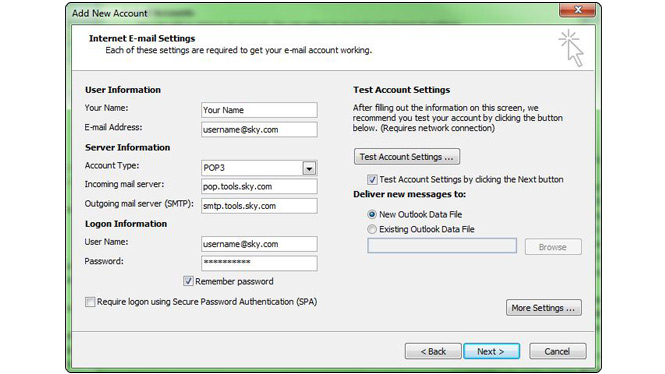
Then, click Next. Outlook 2016 supports standard POP3/IMAP email accounts, Microsoft Exchange or Office 365 accounts, as well as webmail accounts from a range of providers including Outlook.com, Hotmail, iCloud, Gmail, Yahoo and more. For HostPapa email services, select POP or IMAP. Manually set up POP3 or IMAP email accounts Once you have clicked the radio button next to POP or IMAP, select Next to proceed with your email account configuration. You’ll need your email server details, username and password to hand. Enter the following details: • Your Name: Enter the sender’s name you’d like to appear on your emails. • Email Address: Your full email address.
• Account Type: Use the dropdown menu to select POP3 or IMAP. • Incoming mail server: For POP or IMAP accounts use mail.yourdomain.tld if you’re on shared plan (replace yourdomain.tld with your actual domain) or mail.papamail.net if you use Basic/Advanced Email services. • Outgoing mail server (SMTP): For POP or IMAP accounts use mail.yourdomain.tld if you’re on shared plan (replace yourdomain.tld with your actual domain) or mail.papamail.net if you use Basic/Advanced Email services. • User Name: Your email account username. • Password: Your email account password. Now click the More Settings button. In the Internet Email Settings window that opens, select the Advanced tab.
Enter the following details: • Incoming server: Ensure the default port is set to 995 for POP accounts, or 993 for IMAP accounts. Click the checkbox next to This server requires an encrypted connection (SSL).
• Outgoing server (SMTP): Change the default port (25) to 465 for POP or IMAP accounts. Use the dropdown menu next to Use the following type of encrypted connection to select SSL. Switch to the Outgoing Server tab. Check the box next to My outgoing server (SMTP) requires authentication, then click the radio button next to Use same settings as my incoming mail server. Click OK to close the Internet E-mail Settings window.
In the POP and IMAP Account Settings window, click the Test Account Settings button to ensure Outlook can communicate with your email server. If the test fails, retrace your steps, ensuring your server and account details have been entered correctly. Once the test completes successfully, click Next and then Finish to wrap up. If you notice any problems or if you need any help, please from your HostPapa Dashboard.