Add A Data File Outlook For Mac
Outlook 2016 MAC does not allow to export data files anymore, which in fact seems to be huge disadvantage of the new version. I need to store and safe Outlook data on a monthly/yearly basis for business reasons and also like to start with empty folders on 1st January without having saved the data before. – Database file for Mac: for Mac OS X systems, Outlook stores the indices in a proprietary Database file and stores the data records as a series of files nested within folders. Each folder can hold up to 1000 email items.
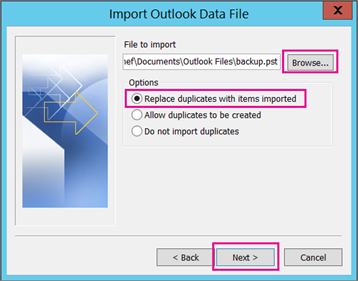
If you have an old pst or an old archive pst and you want to view your old email, you can open it in your Outlook profile. Do not use File, Import and Export menu, especially if it's an Archive pst – you may end up with duplicates and will not be able to remove them using Autoarchive (because archive uses the modified date and importing changes the modified date). Just open the pst file in Outlook. Windows 7 create bootable usb for mac os x recovery disk assistant. To open a *.pst while Outlook is running: In all versions of Outlook: go to File, Open, Outlook Data File menu and browse to find the personal folders data file (pst) you want to open.

Note: the exact name of the menu command will vary slightly between versions (but will always begin with Open). In Outlook 2016, the Open command is Open & Export. Adding a pst using this menu will add the pst to the profile, where it will remain until you close it, either by right-clicking on it and choosing Close [pst name] or going to Account Settings, Data Files tab then selecting it and clicking Remove. In Outlook 2010 and up the screen will resemble this: In Outlook 2007 and older versions of Outlook, browse to File, Open, Personal Folders File. This screen shot is from Outlook 2003.
To add an existing personal data file to your profile: The steps to open an existing data file in your profile are similar in all versions of Outlook but the dialogs are different. In all versions: • Open Control Panel and find the Mail applet. If you use the Category view in Windows XP, Windows 7/8/10's Control Panel, look for the Mail applet in the User Accounts category, or type Mail in the search field • Select the Show Profiles button. If you only have one profile, you can click the Data Files button. • Select your profile and click Properties Continue the steps for your version of Outlook below.
Outlook 2007 and up Click Data Files to open the Account Settings dialog to Data Files To add a pst file to your profile, click the Add button and select the data file you want to add. In some versions, a dialog will ask what type of data file (Outlook data file or Outlook 97-2002 data file), just click Ok to move to the Open file dialog. Select the pst file you want to use as your default for delivery and click Set as Default. Outlook 2003 and older If you just created your profile and have the Profile dialog open, skip to Step 2 after clicking Finish in the profile wizard. • Select Email Accounts then View or change email accounts. • Select New Outlook data file and find your existing PST, add it to the profile and set it as the default. • Ok your way back to the Email Accounts dialog and select the PST you just added in the Deliver new e-mail to the following location field.